
Monday, April 29, 2013
Protest or Persuade
Students must select a topic in which they protest, or persuade. The primary photo used for the topic, must be taken by the student. The topic must be presented clearly, as well as their stand on the topic.

Sunday, March 24, 2013
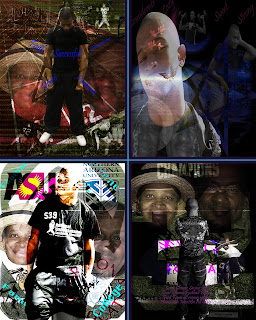
Quilts
Students will be creating four individual projects into one final piece. Each square has a specific theme.
How I see myself on the inside
How others see me on the outside
My Past
My Future
Each square must be 8 X 10, contain at least one photograph student has taken, text or words, one or more personal symbols. Create an emphasis in each square, so our eyes know where to go first. This will provide unity within the whole piece.


.jpg)


Sunday, March 3, 2013
Know Your Motto

Colorado, Justin Fuller

Nevada, Katie Lee

Arizona, Erin Finsrud

Michigan, Friends of Type
"Know Your Motto" was originally started by Dan Cassaro. This project was to illustrate the state's motto. Students are making their own rendition of this concept. They are to choose a state, stick with a purple and gray palette, then come up with a concept that depicts the motto of the state they have chosen to make this representation.
Tuesday, February 19, 2013
Reflection

Students learned how to draw a realistic eye using Photoshop. Then, they had to choose what would appear as the reflection. Why is this image so important to be seen?
Monday, February 11, 2013
A Day in the Life of . . .

Students are to create an essay using photos. The photos should tell a story and reflect a day in their life. This can be a particular event, or just an average day. Keep in mind that the pictures should have good composition, good exposure, and be aware of the content in the background.
Tuesday, January 22, 2013
Social Issues
We will be using Barbara Kruger's artwork as the jumping off point for our Social Issue Project.


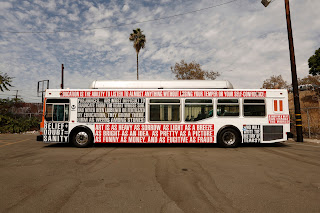


When we talk about social issues in class, what we are actually talking about are the ideas and beliefs that society as a whole presses down upon us, that end up effecting our lives in one way or the other. Some social influences are very general and effect most people, and then they individualize themselves depending on who you are, and where you are in life.
In this project you will be challenged to identify a social issue that affects you and your life directly. The concept for this project is the MOST important part. The first thing you will need to do is complete a brainstorm sheet.
When you find the issue you would like to address then you need to take photos for it. It can be one photo or many. All photos will be desaturated black and white. If you would like to combine photos in photoshop it will be entirely up to you. It will all depend on what you are trying to accomplish.
You will need to come up with a statement. Remember, Barbara's statements are not obvious. She doesn't say, "all of us have something we fight with" She says, "Your Body is a Battleground". It is a statement, a strong statement, but also one that allows us interpretation. Your statement is perhaps the most important part of this assignment.You will add your statement to your image on an 8x10 document. You will ONLY use RED, BLACK, and WHITE for your lettering. You can add boxes and borders with those colors as well. The font you choose needs to be one of the simplistic block fonts.
While the project will be simple in the set up, the meaning should extend to great depth.
Saturday, January 12, 2013
Advanced Camera Setting Contact Sheet
Five labeled examples of each setting. The design element is up to the student, and they will use the skills they have previously learned to display their examples. Students will also post which example is their strongest, and why.


Sunday, January 6, 2013
Advanced Camera Functions
Students will post examples of photos using adjustments with ISO, Aperture Priority, Shutter Priority, Panning, and Continuous Frames.
ISO - rating of film's sensitivity to light. Low ISO, such as 100, is less sensitive to light and therefore needs more light to capture detail in an image; high ISO, such as 800, is more sensitive to light and needs less to capture detail. Low ISO creates higher-quality images and high /iso creates lower-quality images with visible grain.
How to change settings on camera;
Switch the dial to M (manual), then push the menu button, select camera menu, scroll down to ISO, select your speed, then press ok. If you need to use the flash, press the flash symbol (lightning bolt with arrow) next to the arrow sign. Choose the option without the slash through it.
Aperture - hole or opening in which light travels through
 When using the aperture priority mode, you have more control over the depth of field (distance between nearest and farthest object in a scene that appear sharp/in focus).

How to change settings on camera;
Switch the dial mode to A (Aperture). Keep in mind, the higher the number the smaller the opening. This means that less will be in focus in your picture. After choosing the Aperture mode, press the +/- symbol. This symbol will increase aperture, and the clock symbol will decrease. Look on your screen and it will display the changes. Choose different settings to see the difference between settings.
Shutter Speed/Exposure Time - is the effective length of time a camera's shutter is open. If you want to catch a snapshot of something in action (basketball game), you would have a fast shutter speed. A slower shutter speed will allow you to show movement over time. Such as the headlights on a car. You can have one object that is still, and the background display movement.
How to changes settings on camera;
Switch the dial mode to S (Shutter Priority). Same as adjusting the aperture. Choose the +/- to increase and the clock to decrease. Again, watch your display screen to see your changes. Try multiple settings to get the right photo.
Panning - Set your ISO to the lowest setting. Then adjust your shutter speed so that your exposure time is long (slow shutter speed). While the shutter is open, slowly move camera to the left or right to follow the moving subject. You may want to use a tripod for this technique. Begin panning before subject comes into picture. This will take several tries to capture.
Continuous Frames - This refers to shooting multiple shots consecutively without a break. Think of a flip book.
 How to change camera settings:
Switch the dial mode to A (Aperture). You will have to set the correct aperture for your shot. Once you have done this step, select menu. Choose camera menu, set the ISO to 400. Then select drive. After you select drive, choose the Hi2. When you are ready to shoot your subject, hold the shutter button down until you have captured the entire shot. Review it to make sure the settings are correct. It should read as a step by step image.
ISO - rating of film's sensitivity to light. Low ISO, such as 100, is less sensitive to light and therefore needs more light to capture detail in an image; high ISO, such as 800, is more sensitive to light and needs less to capture detail. Low ISO creates higher-quality images and high /iso creates lower-quality images with visible grain.
 |
| low speed |
 | ||||||||
| high speed |
Switch the dial to M (manual), then push the menu button, select camera menu, scroll down to ISO, select your speed, then press ok. If you need to use the flash, press the flash symbol (lightning bolt with arrow) next to the arrow sign. Choose the option without the slash through it.
Aperture - hole or opening in which light travels through


How to change settings on camera;
Switch the dial mode to A (Aperture). Keep in mind, the higher the number the smaller the opening. This means that less will be in focus in your picture. After choosing the Aperture mode, press the +/- symbol. This symbol will increase aperture, and the clock symbol will decrease. Look on your screen and it will display the changes. Choose different settings to see the difference between settings.
Shutter Speed/Exposure Time - is the effective length of time a camera's shutter is open. If you want to catch a snapshot of something in action (basketball game), you would have a fast shutter speed. A slower shutter speed will allow you to show movement over time. Such as the headlights on a car. You can have one object that is still, and the background display movement.
 |
| fast shutter speed |
 | ||||
| slow shutter speed, with one object staying still |
 |
| slow shutter speed to capture movement of sparklers |
How to changes settings on camera;
Switch the dial mode to S (Shutter Priority). Same as adjusting the aperture. Choose the +/- to increase and the clock to decrease. Again, watch your display screen to see your changes. Try multiple settings to get the right photo.
Panning - Set your ISO to the lowest setting. Then adjust your shutter speed so that your exposure time is long (slow shutter speed). While the shutter is open, slowly move camera to the left or right to follow the moving subject. You may want to use a tripod for this technique. Begin panning before subject comes into picture. This will take several tries to capture.
 | ||
| note: background is blurred, while subject is in focus |

Switch the dial mode to A (Aperture). You will have to set the correct aperture for your shot. Once you have done this step, select menu. Choose camera menu, set the ISO to 400. Then select drive. After you select drive, choose the Hi2. When you are ready to shoot your subject, hold the shutter button down until you have captured the entire shot. Review it to make sure the settings are correct. It should read as a step by step image.
Subscribe to:
Comments (Atom)